.png?width=212&name=Prospect%20by%20IrisVR%20Black%20(1).png)
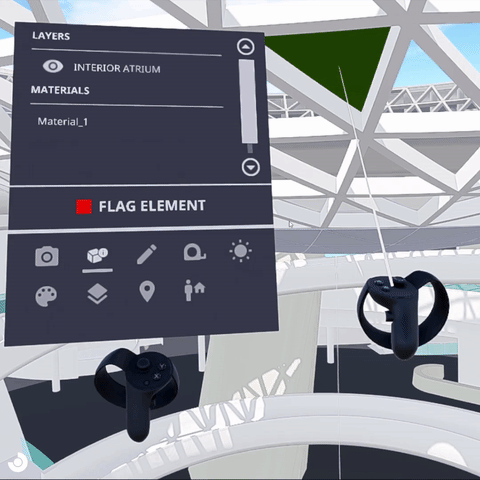
Prospect 1.7 contains a new tool that allows you to read the materials and layers of an element while viewing your project in virtual reality. Additionally, we’ve added the ability to mark the object in red (flag it) so that it becomes clear which parts need to be reviewed and fixed in the original design.
To document your VR meeting, follow these steps:
1. Navigate through model (either by teleporting or viewing a particular Viewpoint) and use the new Inspect Element tool.
- Point at an object to see its properties; press the trigger to select it
- Check the layers and materials associated with the object
- Press the trigger on Flag Element if it needs to be marked up for revision
2. Take a screenshot of the object.
3. Note: This step of the workflow has been replaced by the new Reports tool in Prospect, which will automatically generate a document for you during your design review and model coordination meetings. You can learn more here.
Download our VR Meeting Notes template to document what needs to be fixed and assign tasks as necessary. We highly recommend adding the screenshots from your in-VR review into the document.
4. Share the VR Meeting Notes with your team.
5. Fix your model and continue designing!
Once you and your team start using this review process, we'd love to hear how it's going. We'll be adding additional features into Prospect to help you document your in-VR experience - the meeting notes template is just the beginning - and your suggestions and feedback are incredibly valuable to us.
If you want to learn more about all of the new features included in Prospect 1.7, view our release notes or our What's New page.
